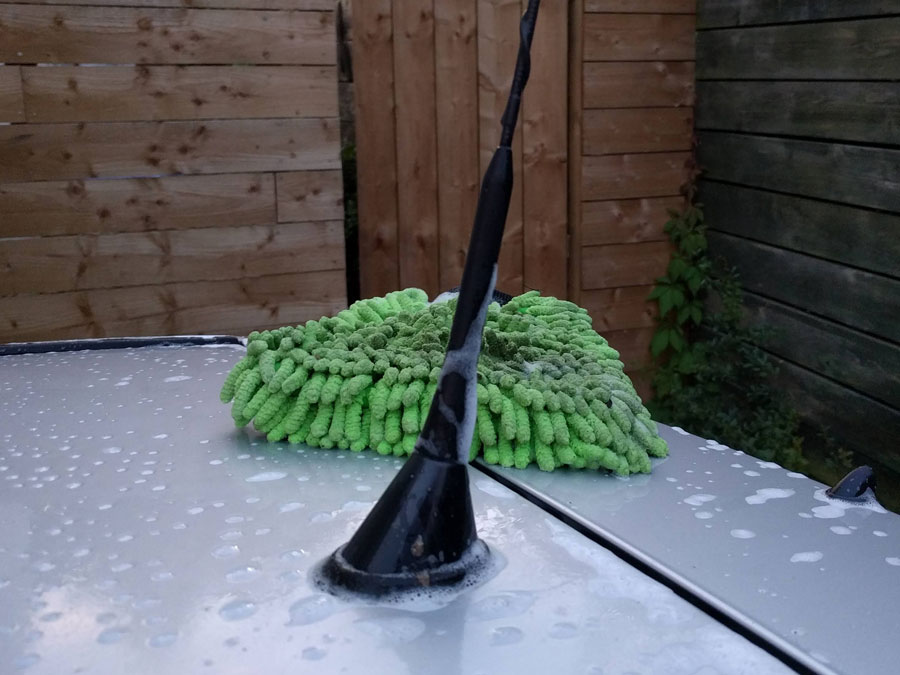
Roof mount DAB aerials are an excellent choice for cars and vans. They can perform better than windscreen and magnetic aerials, which means digital reception should be more reliable.
These types of aerials replace the existing car aerial. Roof mounted aerials tend to be suitable when the car already has a roof mounted aerial for FM/AM reception towards the back of the car. The new aerial will continue to provide the FM/AM signal to the radio, as well as DAB digital radio through a new connection.
In this guide
- Suitability of DAB roof aerials on cars
- Choosing a DAB roof mount aerial
- Alternatives to DAB roof mounted aerials
- How to install a replacement roof DAB car aerial
- Deals on DAB car roof aerials
Suitability of DAB roof aerials on cars
One of the main advantages of roof mounted antennas is that they replace the existing aerial. This means that no new holes or cables on the exterior of the car are visible. To most people the car would look unmodified.
There are some checks you can do with your vehicle to see if it will be suitable:
- Does the car already have a roof mount aerial? If the aerial is in the bodywork or embedded in a rear window there will not be an aerial to replace.
- Where is the roof aerial? If it’s at the back on a flat surface it should be possible to replace the aerial. If it’s at the front near the windscreen it’s unlikely that it can be replaced, due to the curvature of the roof.
- Can the underside of the roof be accessed? The headlining in the car’s interior will need to be dropped so that the securing nut and wires can be accessed. There is a risk of damaging or creasing the headlining.
- Does the aerial base have a built-in washer jet? None of the replacement aerials we’ve seen would be suitable.
Examples of cars with roof aerials which are suitable for a replacement DAB aerial are some Vauxhall, Skoda, Volkswagen and Renault models. Some cars with roof aerials are not suitable for a replacement DAB aerial, like the Ford Focus (MkI and MkII) which has an aerial towards the front of the roof. The replacement roof aerials which are available would not be suitable due to the curvature of the roof.
Installation precautions
Roof mounted DAB aerials can be installed on cars, vans and motorhomes with no existing roof aerial. However, the process would be more complex as it would require a new hole to be drilled in the bodywork.
There is a risk of damaging the headlining when changing the aerial. Access is required at the front of the car too in order to bring the new cable for the DAB output to the radio. If you’re not confident about being able to avoid this risk it is absolutely worth finding a professional to handle the installation.
Companies which specialise in audio installations should be able to provide a quote for installing a roof mounted aerial. Garages and main dealers may be able to help too. We’re aware of an installation of a roof mounted aerial and DAB radio (supplied by the customer) carried out by a Skoda main dealer for £120 in labour fees.
Choosing a DAB roof mount aerial
Roof mounted DAB aerials can be purchased for between £30 and £100. Aerials are offered by brands like Connects2, Autoleads, Kinetic, Hama and JVC. These aerials all look fairly similar, although the length of the mast can vary.
Some aerials are suitable for GPS as well as DAB, AM and FM.
Not all aerials come with the cables that you’ll need to install the aerial. The length of any included cables and the types of connectors can vary between aerials.
It’s a good idea to write out a shopping list so that you don’t have to keep ordering cables or adapters after buying the aerial.
A shopping list for our example installation in a 2004 Vauxhall Corsa C with a Sony DAB stereo would be:
- Kinetic RDA-6001 DAB Roof Mounted Aerial
- DAB Aerial Cable, 5 meters, with an SMB connector
- FM/AM Aerial Cable, 5 meters, with a male DIN connector
- Automotive power cable (for the 12V connection) and crimp connectors
- Tools: 17mm spanner, adjustable spanner, general purpose grease, crimping tool
Alternatives to DAB roof mounted aerials
Although a roof mount DAB aerial is likely to offer the best performance, it’s not always possible or practical to install one on a car or van.
The next best thing to a roof mount aerial is a magnetic DAB aerial. These benefit from being external (i.e. outside of the car) and in a high position, such as on the roof. Installation is easier and they can be used on cars without a traditional roof aerial.
A splitter / convertor could be a good option too. Where the car aerial is mounted on the wing or is an electronic extending aerial a splitter could be used. Splitters only work on non-amplified aerials.
Finally a windscreen film antenna could be another option.
How to install a replacement roof DAB car aerial
In our example installation we are using a Kinetic DRA-6001 aerial on a Vauxhall Corsa.
1. Preparation and installation planning
Read the instructions that come with the aerial thoroughly and pay particular attention to precautions and warnings.
If in doubt at any stage always speak to a garage or auto electrician. Ensure that power is off before making electrical connections with cables.
Check that you have all the parts which come with the aerial, as well as any extra leads and adapters.
Clean the car so that debris, moss and contaminants don’t get in the way and disrupt the seal between the aerial and the bodywork. Keep your hands clean so that you don’t mark the interior or headlining with dirt or grease.
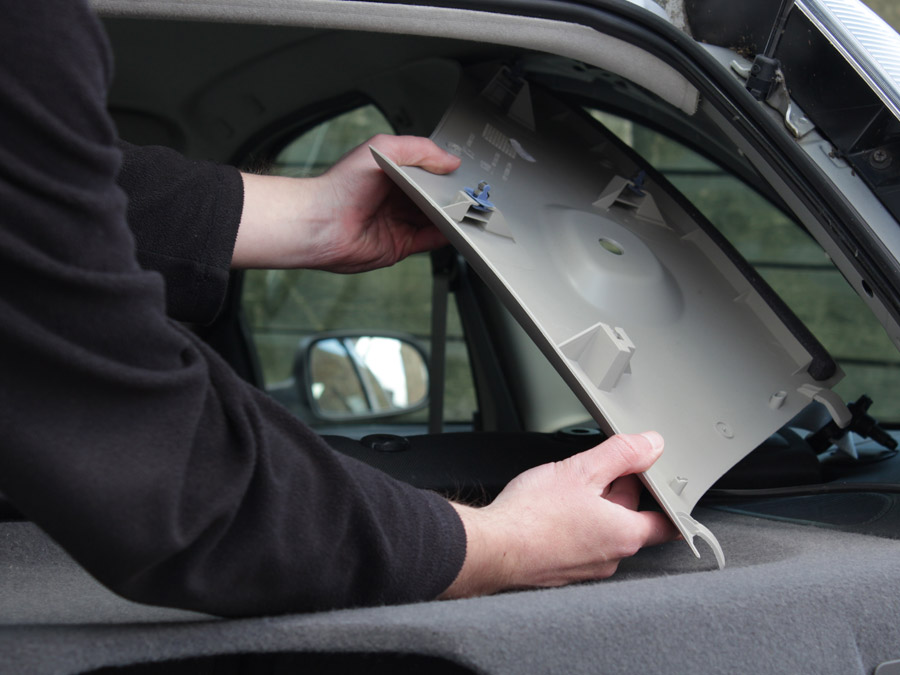
2. Remove the trim and headlining
Before the new aerial can be installed the old one will have to be removed. To access the fixing and wire for the old aerial the headlining or an interior light may have to be removed. Each car is different, so the process for this step will depend on your car.
In the Corsa we need to drop the headlining by first removing the two trim pieces above the parcel shelf. A fastener in the centre of the headlining next to the boot opening is also removed. Now the headlining can be carefully pulled down to see the existing wiring and securing nut.
Be very careful not to crease the headlining in the centre and where any other trim is still in place. In this car it’s above the front doors.
3. Remove the old aerial
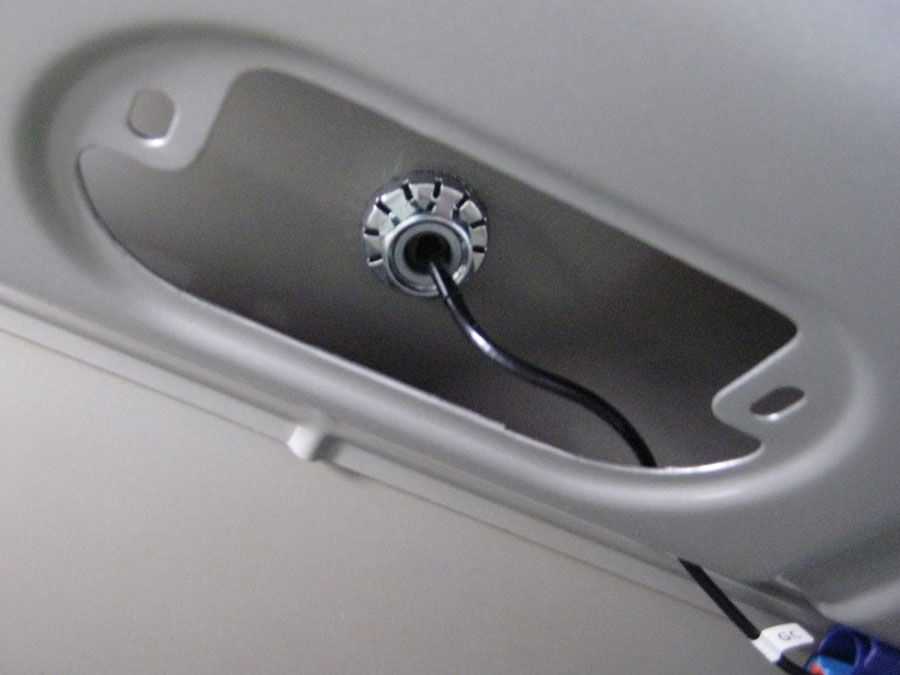
With access to the underside of the roof the old aerial can be removed. A nut holds the aerial down on the bodywork. The nut needs to be undone and the existing aerial connector should be disconnected.
In the Corsa this is a 17mm nut. There is not much access for a spanner, but fortunately it’s not very tight. A slotted socket for temperature sensors or a box spanner might also work.
The metal edges behind the headlining and plastic trim can be sharp. Be careful when working around this bodywork or wear suitable gloves.
The cable from the base of the old aerial goes to a connector which is fixed to the underside of the roof. Using a small screwdriver a tab is pushed in to release the connector.
4. Prepare the roof for the new aerial
Once the nut is undone the old aerial should be loose and can be lifted off the car.
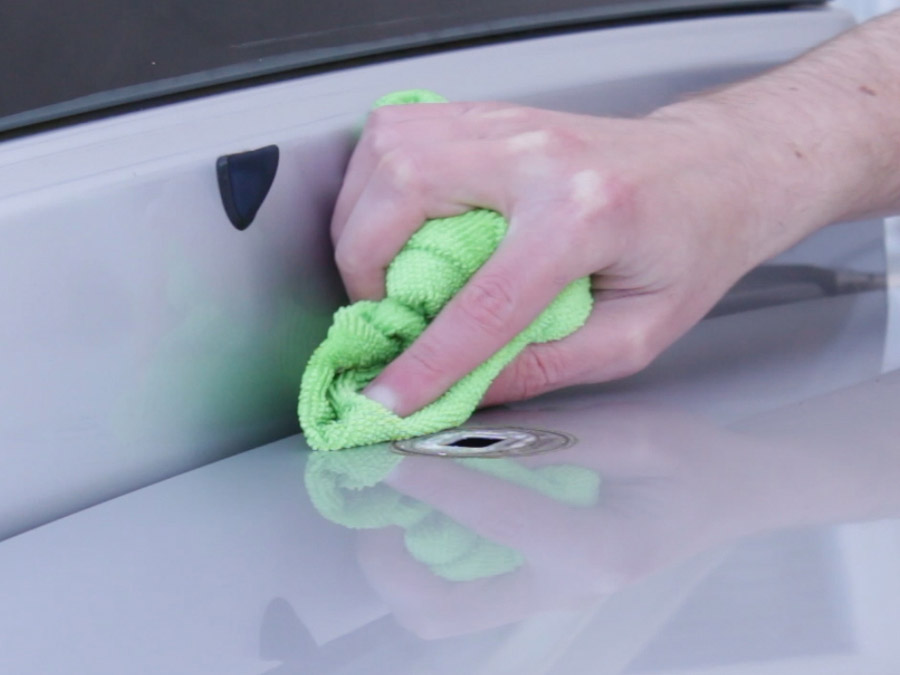
To ensure a good seal when the new aerial is installed the area under the old aerial should be cleaned and dried.
The instructions for the new aerial say that the underside of the roof (on the inside of the car) needs to be sanded to bare metal. This can leave dust around the hole and on the outside of the roof, which may require wiping over again.
5. Choosing the new aerial base seal
Now the new aerial can be installed. The mast has been removed from the base by twisting it off. This will make it slightly easier to handle.
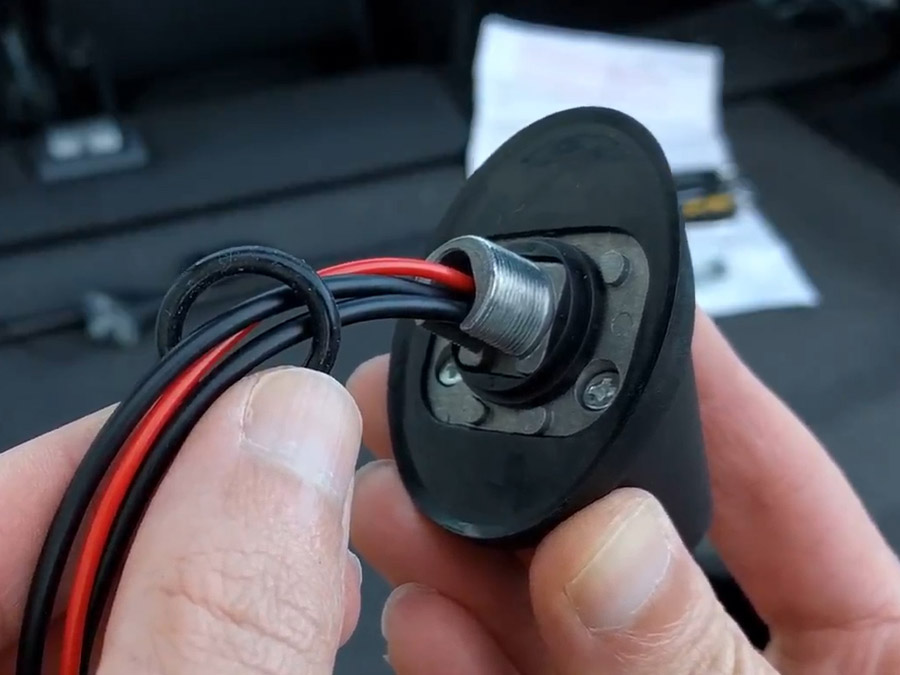
The aerial we are using comes with two types of seal or grommet. Depending on the existing hole in your car’s roof you may need the round seal or the square one. On the Corsa’s roof the hole is square, so the round grommet (shown on the right) should be removed and the flexible ring stretched (shown on the left) around the square part of the base.
To confirm this is correct we checked the old aerial which has a single round seal (like an O-ring) around the square part.
6. Install the new aerial base
The instructions specify that all of the mounting components should be heavily greased. We are using multi-purpose grease from a motor factors.
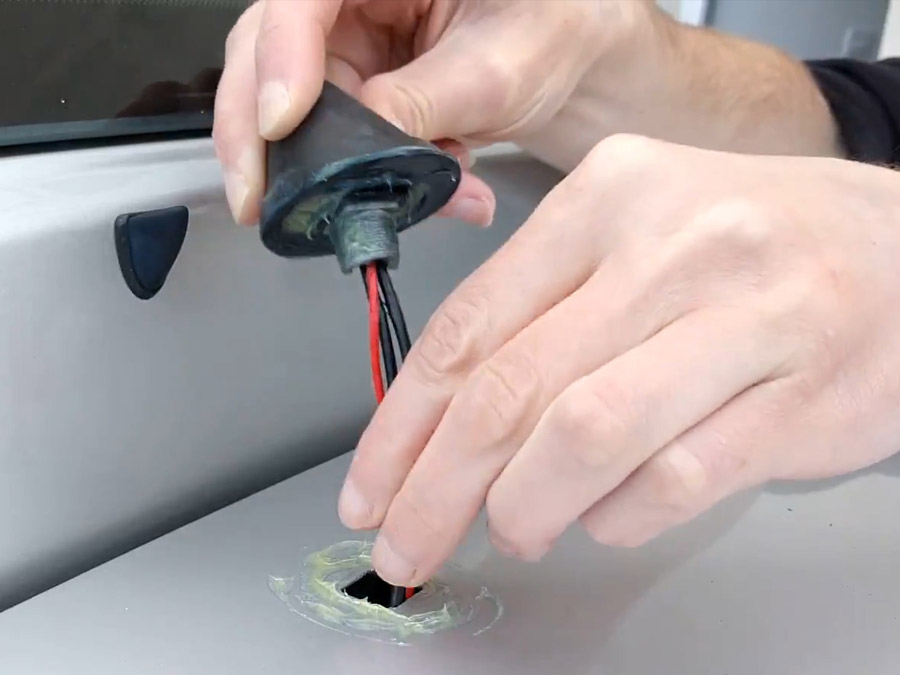
The bottom of the aerial base and the chosen grommet are heavily greased, as is the hole in the roof and the underside around the mounting hole.
As the cables are short with their own connectors these are be dropped through the hole first. Then the threaded part of the base is lowered through the hole.
The supplied nut is then twisted on to the thread and done up with an adjustable spanner. As the nut is tightened we can see grease being pushed from under the aerial base.
7. Connect the cables at the aerial
The long DAB and FM/AM aerial cables can be plugged in to the connectors on the end of the aerial wires. These will go through the interior to connect to the stereo.
A new cable needs to be made for the 12V feed. The aerial has a crimped female connector to be used with a spade connector. This new connector is crimped on to the end of the power wire and then plugged in to the aerial.
If you are not confident with making this electrical connection seek the advice or assistance of an auto electrician or mechanic.
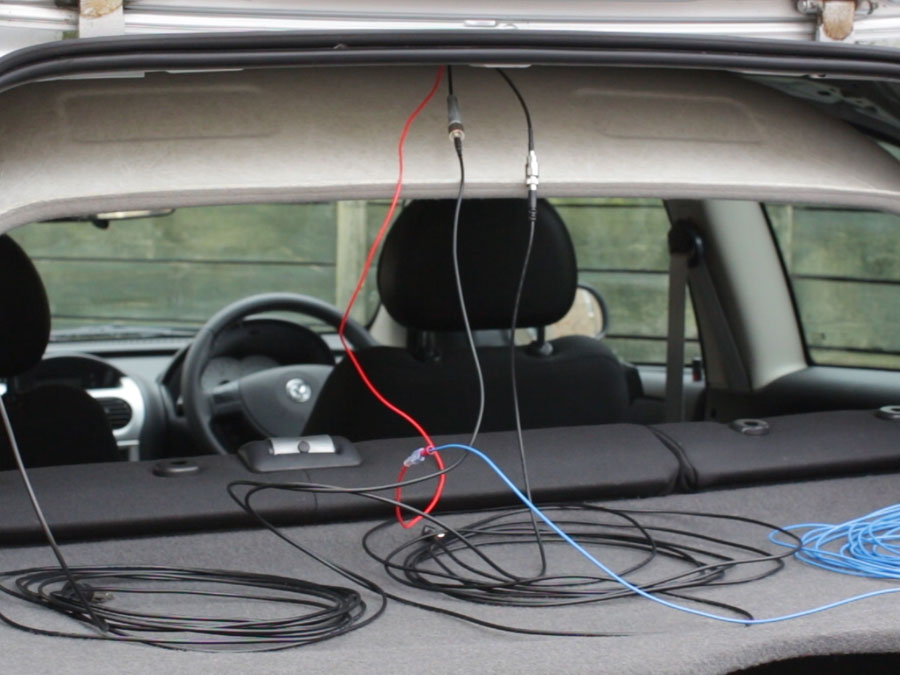
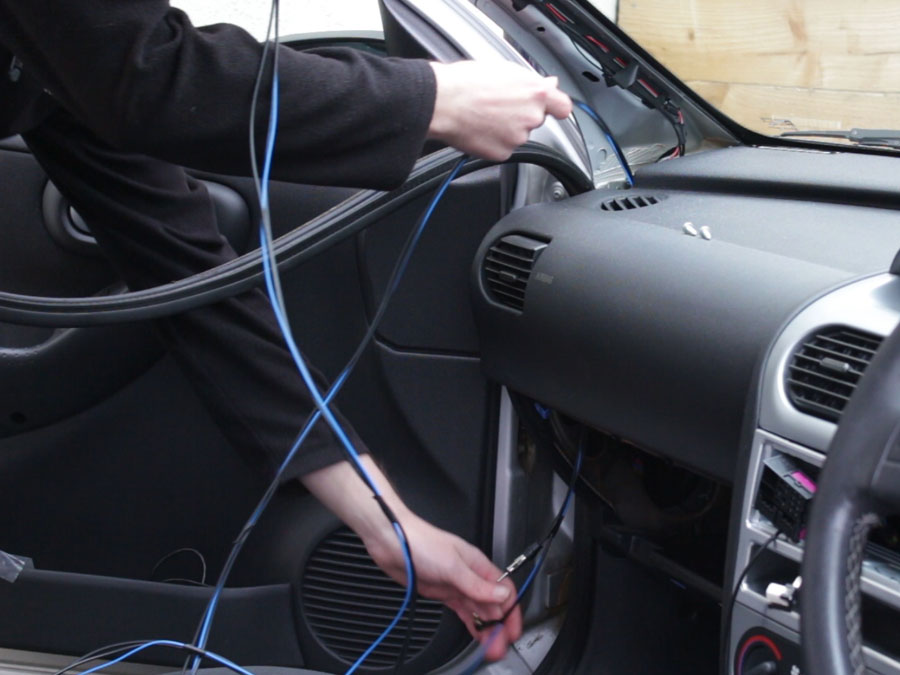
8. Feed the cables through the interior
The cables can now be fed from the aerial base to the radio. You might be able to trace the old cable and follow this. The three cables can be taped together to make feeding them through easier. Some parts of trim will probably need to be removed to make the installation neat and tidy.
On the Vauxhall Corsa the existing cable comes down the side of the boot opening and goes along the sill. The cable will be fed through the roof as there is already access at the rear of the car and it will be easier to remove the A-pillar trim at the front instead of removing several trim pieces along the sill.
The cable is brought behind the glovebox and up to the radio slot.
The old disconnected cable is being left in place. Should the car be sold in the future there will be the option to swap the aerials over and keep the new one.
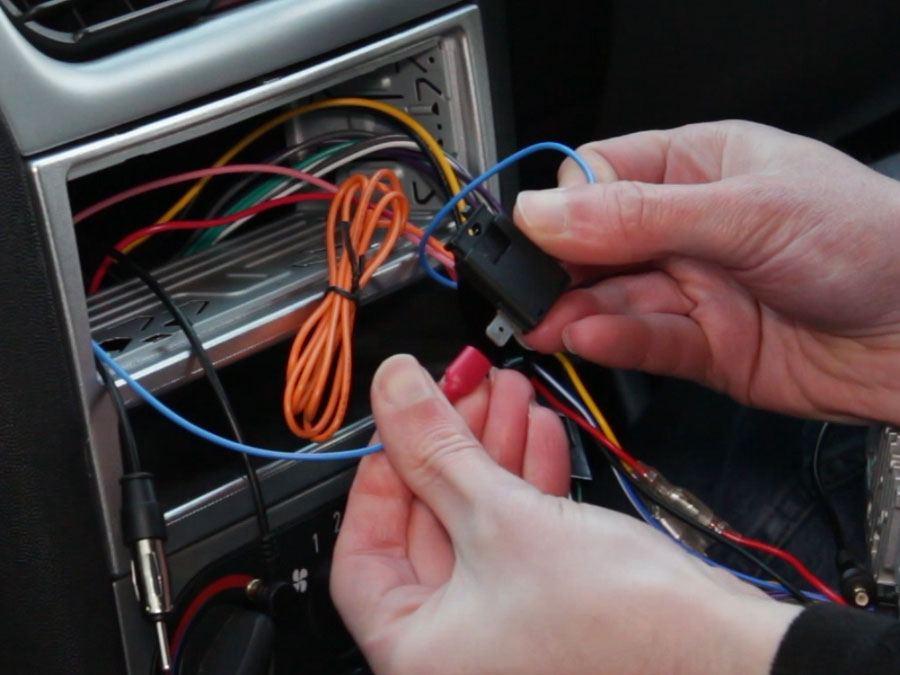
9. Connect the cables to the radio
Before reinstalling the roof lining and trim it’s worth checking that the aerial works correctly. If you haven’t installed the DAB radio yet it would be a good time to do this.
The aerial connectors push into place on the back of the radio.
The power cable should be connected to an ignition switched 12V source. Most car radios have an output for a powered antenna – check the manual for your radio to see which this is. An appropriate inline fuse should be used between the radio and the aerial.
We will crimp a female spade connector onto the power wire which comes from the radio and the power wire which goes to the aerial. A fuse holder can then be installed to take a suitable fuse. The instructions for your aerial should recommend a suitable fuse.
Switch on the car stereo and check that DAB, FM and AM stations are working.
10. Re-install the trim and headlining
This step is essentially the reverse of step two. With the aerial installed, the cables routed and the radio working the plastic trim and headlining can be reinstated.
Care needs to be taken when pushing the trim in place, as there are new cables behind the plastic now. Be careful not to catch any cables, especially where fasteners need to locate in holes in the bodywork.
Be careful not to squash any cables behind the headlining or trim. If it doesn’t seem right you could find a better route for the cable.
Test reception on DAB, FM and AM to complete the installation.